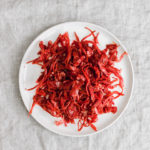
Probiotic Beet Ginger Superkraut with Native Herbs
Earth warrior food at its finest. Colourful, delicious, so easy to make, and teeming with essential live biotics, this beet ginger superkraut with native herbs makes an amazing everyday condiment with most any meal to support vibrant health.
Servings: 1 large jar
Ingredients
- 1 head medium-large organic green cabbage, quartered, cored, and finely sliced (save a flexible outer leaf for covering the mixture)
- 2 medium organic red beets, shredded
- 6 medium organic carrots, shredded
- 1 4-inch piece organic Atlantic wakame, ripped into fine shreds (or other organic sea vegetable closest to your bioregion)
- 1/4 cup wild purslane or nettle leaves, finely chopped (or other wild, unsprayed herb growing in your bioregion)
- 2 nubs fresh organic turmeric root, peeled and finely grated with a Microplane grater
- 1-inch nub fresh organic ginger, peeled and finely grated with a Microplane grater
- 2 tsp organic caraway seeds
- 2 tsp organic juniper berries
- 1 tbsp sea salt (I used Celtic sea salt) note - use generous sea salt, you'll want to use the equivalent of at least 2% of the sauerkraut's volume. I find 1 tbsp covers all the bases and works for me. Table salt has additives that mess everything up. Don't go there!
- 2 tbsp old organic sauerkraut juice to speed up fermentation (optional)
Instructions
- Sterilize your mason jar(s) and work bowl by pouring a bit of hot, boiled water into each of them, rinsing out the inner surface for a few seconds, and emptying the jars.
- Rinse all ingredients with filtered water before preparation.
- To a large bowl, add the cabbage, beets, carrots, wakame, purslane, turmeric, ginger, caraway seeds, and chili flakes. Season everything liberally with sea salt. Massage the vegetables for a good 5 minutes or until a small amount of liquid collects at the bottom of the bowl. Use gloves if you prefer to avoid staining.
- Pack the vegetable mixture with their liquid into 1 or 2 large glass jars with tight-fitting lids. Press down with your hands or a spatula so that the vegetables become submerged in their own liquid. Leave at least 1 inch (2.5 cm) empty at the top of the jar. Press a cabbage leaf onto the surface of the mixture in each jar, and press down to secure the mixture. Secure the lid on each jar.
- Since the liquid in this can stain, I like to open the lids over the kitchen sink once they're done fermenting to prevent the juice from spraying everywhere due to the pent up gases. Make a note to check the jars in 3 weeks. The sauerkraut should taste lightly sour and tangy, and should have some texture when you bite into it.
- Once the vegetables are fermented to your preference, remove the cabbage leaf covers, and store the jars in the refrigerator indefinitely.
Notes
- True sauerkraut is earth medicine; the result of wild fermentation. Making your own ensures you'd be reaping all of the benefits!
- The beets and turmeric will absolutely stain your hands. You can use gloves if you like, but I usually just don't bother, it eventually fades away, like most things.
- 3 weeks typically works for me, but depending on the temp of your living space, this may be shorter or longer. Adjust according to where you're at and give it a taste test every few days. Longer fermentation time is not necessarily better. Don't let it go for too long or it will diminish the probiotics as the bacteria run out of food to eat and start to die. One exception to this is placing fruit or other foods such as flax seeds in kefir, when you add them they will create more food for the bacteria to consume!
- I included the caraway seeds as they contain antimicrobial properties and can further support the development of beneficial intestinal flora when consumed while supporting the circulation of blood and intestinal mucus through the stomach, and improving overall digestion. The oil in caraway seeds is antihelmintic and antiseptic, so they effectively expel worms and infections from the body.
- Never use tap water, as it's full of toxic chemicals that will disturb the fermentation process, not to mention your precious and diversified gut flora.
- Never use processed table salt, as it will affect proper fermentation and your gut flora. Always use whole sea salt or mountain salt.
- Mason jars are easiest for me to find, but traditional ceramic or clay fermentation crocks are more interesting if you can find them.
- Plastic lids are generally more recommended than the metal lids with the bands. I use the metal lids, but I just ensure the vegetables do not make any contact with the lid, and leave extra room near the top as the metal can rust over time.
- Lacto-fermentation is an anaerobic process which many people say requires an airtight lid, but I've found that I could really use any type of jar, including reusable ones that once held other foods as long as they're clean. The lid doesn't have to be screwed on tightly, and only needs to be gently closed - the ferment will turn out just fine. You don't need an expensive, fancy jar!
- Always use an uncoated wooden or plastic or silicone utensil to stir or scoop out probiotics. Metal can react negatively with probiotics and can break them down, so avoid probiotic food contact with metals. If you've accidentally used a metal spoon like I have a couple times, it should be fine. One exception for this is kefir, using metal to prepare or eat kefir is actually okay.
- If you have a glass fermentation weight, feel free to use it too, though I don't find it necessary.
- If any Kahm yeast (thin white film) appears on the surface during or even after fermentation, don't worry, this is not harmful, simply scrape it off and you're good to go. Kahm yeast will persist once it occurs, and though it is harmless, it will affect the flavour of the sauerkraut, so consume quickly before more grows, and keep the mixture packed down in the jar.
- Prevent Kahm yeast by using airtight jars and not letting your ferment stay exposed to the air for too long. Use thoroughly cleaned equipment (I like to briefly run the utensils, jars and bowls involved through hot, boiled filtered water before use). Use enough salt equivalent to at least 2% of the sauerkraut's volume, and keep everything submerged in its liquid as much as possible throughout the entire process.
- Kahm yeast is different from mould. Mould is easy to identify, it will be green, blue or white in appearance, fuzzy or hairy rather than smooth, and can grow above or below the surface of the ferment. When mould occurs, discontinue the ferment and do not consume, discard the mould and place the rest in the compost.